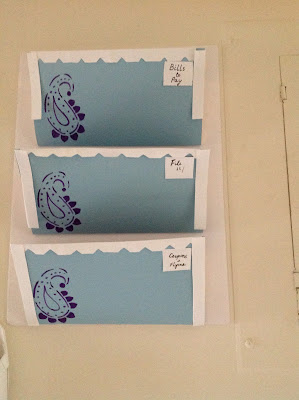
Love our apartment, not the clutter of paper, mail etc. so, I dig up pinterest and found some inspiration to create a mail sorter/organizer. However, I did not find anyThing worth replicating exactly how it was, because:-
A) didnot meet my criteria of recycling/ upcycling.
b) needed investment of about 20$.
So, i looked around my home, and found these things to match the cereal boxes mail sorter i saw.
We do not eat cereal, as it is so loaded with simple carbs. At one point, i wanted to buy just 3 boxes to give life to this project, but than my recycling urges kicked in. Later my software developer blood started boiling, and I wanted to develop something from scratch...the same way I cook my food. Gives a proud feeling, so what if it takes like 2 hours to imagine, design, redesign, and finally put it on the wall. Here is a picture to keep you motivated inspite of the rant!
Supplies to buy:
1) craft paper - one sheet: 1$
2) foam board - one : 1$
Other supplies:
3) scossors
4) one folder
5) gum
6) double sticking tape or mounting tape
8) marker for decoration
*****************************************
Step 1--
Design your mail sorter:
I needed 3 folders- bills to pay, docs to file in the filing cabinet, coupons & flyers.
Basically, as soon as a mail came in, i am supposed to keep it in the flyers/ coupon folder or the bills to pay. Any junk mail, is shredded then And there and trashed in the bin closeby.
Step 2--
Location:
Near the foyer or entry way Or kitchen close to trash can
Step 3--
Execute:
1- Cut out a rectangle of size 11.5 * 11 inch.
2- fold the rectangle across the breadth at the 6 inch length. This give you a folder/ holder.
3- take an old file folder(Yellow color) and cut a triangle to cover the sides of the holder you created with size 6 * 6* 3.5 inch. Easy way would be to place the Yellow folder against the blue holder and decide how big of an opening you want. Then cut off that much from the yellow folder.
4- slightly fold the sides of the yellow folder and stick it to the holder using glue or masking tape. Next to make it stronger, you may want to stapple it as well.
5- make as many holders as your design needs.
6- the ugly staple marks have to be hidden. I recycled some white paper and made a nice border. I also made a paisley pattern on a stencil and drew it out using a purple dry erase color.
7- finally, i wrote out the labels and stuck them to the right corner like stamps on an envelope!
8- attached each holder onto the foam board using double sticking tape. Then, attached the foam board to the wall using more tape!
Done-dona-done!!!!!
Am so happy how this turned out!
